• Post 1
  • Post 2
  • Post 3
Showing posts with label tutorial photoshop text. Show all posts

Glossy Candy Text Effect

This tutorial photoshop text will help you create an awesome glossy candy text effect in a simple way.
The Final Result:
Notes:
* the software used in this tutorial is Adobe Photoshop CS5 Extended
* the size of the final result image is 2000 * 1500
* you might want to check the Basix Page to see some useful topics on dealing with Photoshop basics, such as loading palettes and some shortcuts.
Resources:
Step 1:
Start by filling the Background with the color #724c21.
Then, create the text using the color #ee9b0f. Very thin fonts do not suit this effect, so make sure to pick a pretty bold font. The font used here is “Fontleroy Brown NF” and the size is 1000px.
Duplicate your text layer, and make the copy invisible (by clicking on the eye icon next to it).
Candy TE step 1
Step 2:
Double click on the original (visible) text layer, and apply the following styles:
- A Drop Shadow using the color #71511b.
Candy TE step 2 - Drop Shadow
- An Inner Shadow, using the color #ffa508. Change the Distance to 0, and the Size to 32px.
Candy TE step 2 - Inner Shadow
- Bevel and Emboss. Change the Size to 29px, the Softness to 16px, and use the color #ef9508 for the Shadow Mode.
Candy TE step 2 - Bevel and Emboss
- Finally, apply Satin, change the Blend Mode to Color Dodge, the color to #705737, and the Contour to Cone – Inverted.
Candy TE step 2 - Satin
Step 3:
Ctrl + Click on the original text layer thumbnail to create a selection.
Candy TE step 3 - 1
Create a new layer above the text layer and rename it to “Noise”. Fill the selection with the original text color #ee9b0f and make sure that its the Foreground color as well, and set the Background color to White. Then go to Filte -> Noise -> Add Noise. Change the Amount to 150 %, make sure that the Distribution is Gaussian, and check the Monochromatic box.
Candy TE step 3 - 2
Step 4:
With the “Noise” layer still active, zoom in (Ctrl + ‘+’) until you are able to see the pixels. Grab the Magic Wand Tool, remove the check next to Contiguous on the options bar (this will let all the pixels of the same color range be selected, whether they are adjacent or not), and select the darkest pixel or group of pixels. Then, hit Delete.
Candy TE step 4 - 1
Change the “Noise” layer Blend Mode to Soft Light, and the Fill value to 50 %.
Candy TE step 4 - 2
Step 5:
- We’ll create the lines right now. So create a new documents that is 110 by 50 px, and set the Background Contents to Transparent, so that you’ll be able to see the pixels.
Candy TE step 5 - 1
- Draw a rectangle using the Rectangle Marquee Tool. You can display the Info palette form the Window menu to help you make sure that the rectangle width is 50 px.
Place the rectangle (or the square) at the center of the layer, then fill it with the color #e8641b.
Candy TE step 5 - 2
- Remove the selection (press Ctrl + D), and go to Edit -> Define Pattern and type in the name of the pattern.
Candy TE step 5 - 3
Step 6:
Go back to the original document, and create a new layer on top of the “Noise” layer. Call it “Lines”.
With the Paint Bucket Tool Selected, change the fill type to Pattern, and choose the one you’ve just created.
Fill the “Lines” layer with the pattern.
Candy TE step 6
Step 7:
Go to Edit -> Transform -> Rotate or press Ctrl + T to rotate the lines until you think the result is good. Hit Enter to confirm.
Then, Ctrl + Click again on the original text layer thumbnail (or icon) to create a selection. Make sure the “Lines” layer is active (selected), go to Select -> Inverse, and hit Delete.
Press Ctrl+D to remove the selection.
Candy TE step 7
Step 8:
Double click on the “Lines” layer to apply the following styles:
- Add an Inner Shadow. Change the color to #ba8c73, and the Distance and Size values to 4px.
Candy TE step 8_Inner Shadow
- Add Bevel and Emboss. Change the Style to Pillow Emboss, the Size to 3px, the Soften value to 1px, and the Shadow Mode color to #ba8c73.
Candy TE step 8_Bevel and Emboss
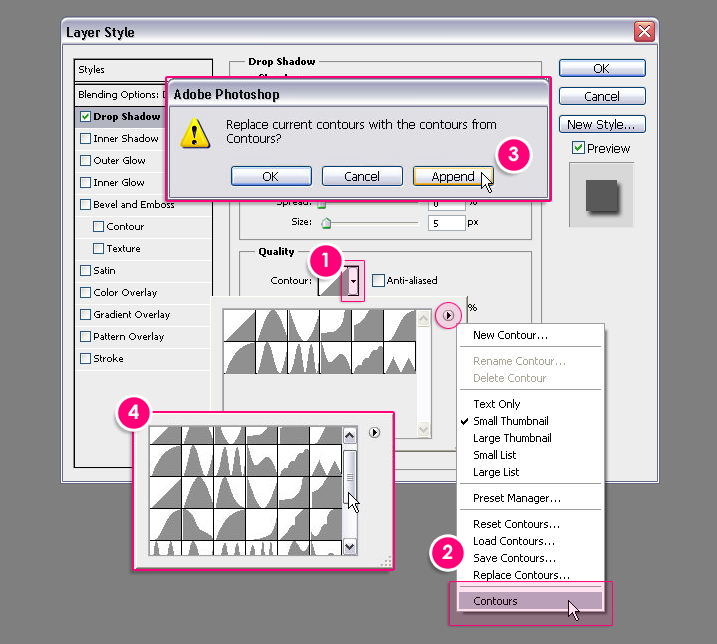
- Finally, add Satin. Change the Blend Mode to Overlay, the color to #fff8ad, and the Contour to Shallow Slope – Valley.
(*Note: If you can’t find these contours, check out how to get them here.)
Candy TE step 8_Satin
You’ll end up with something like this:
Candy TE step 8_result
Step 9:
Now, we need to go back to the duplicated text layer we created back in Step 1, and make it visible once again.
Change its Fill value to 0, and double click to apply the following styles:
- Bevel and Emboss. Change the Depth to 450, the Size to 10, remove the check next to Use Global Light, and change the Angle to 100, and the Altitude to 30, use Log for the Gloss Contour, and assign 0 for the Opacity value of the Shadow Mode.
Candy TE step 9_Bevel and Emboss
- As for the Contour just check the Anti Alias box.
Candy TE step 9_Contour
Step 10:
Add a layer above the “Background” layer, set the Forground color to Black, and with the Gradient Tool, choose the Foreground to Transparent fill, click on the Radial Gradient icon, and check the Reverse box.
Starting from the center of the layer, click and drag to one of its corners to create the gradient fill. Change the Blend Mode of the layer to Soft Light.
Candy TE step 10
And this is the final result once again.
Hope you enjoyed the tutorial.
Read More

Creating the HEROES poster in Photoshop

Note: This tutorial photoshop text has been carried out in Adobe Photoshop CS5. Before you continue, make sure you are familiar with the Smudge Tool and other basic tools in Photoshop. Due to copyright reasons, I have changed the “H” in HEROES to “Z”.

Final Result:
1)  Open a new document with the following settings:
2)  Select the Gradient Tool. Open the Gradient Editor and use #252e38, #000000, and #232b34, respectively:
3)  Drag a vertical line on the document stretching from the top to bottom, to form the background:
4)  Create a new Group and rename it as Text.
5)  Select the Text Tool and make the following changes to the Character Settings:
6)  Left-click the document and type “HER”. Duplicate the text layer. Select the original layer, right-click, and choose Rasterize Type.
7)  With the original layer still selected, go to Filter > Blur > Motion Blur. Make the following changes and click OK.
Your image should look like this by now:
8)  Repeat Step 5 and Step 6 but this time type “ES” instead of “HER”.
9)  Align the text layers horizontally; leaving a little space between them for the “O” that we are going to create next.
10)  Create a new Group and rename it as Circle. All of the subsequent layers that we are now going to create should be placed under this group.
11)  Open a new layer.
12)  Select the Elliptical Marquee Tool. Hold down the SHIFT key, left-click, and drag the mouse to create a circle. Fill (SHIFT+F5) this selection with Black.
13)  Place this circle between the two texts.
14)  Open Layer Style for the current layer and make the following changes:
The Color of Glow has been set to #fbe5c5.
15)  Select the Smudge Tool and make the following changes in the Tool Options Bar:
16)  Open a new layer.
17)  Apply the Smudge Tool on the boundaries of the circle to give it a cloudy effect.
18)  Open Layer Style for the current layer and make the following changes:
The Gradient Color has been set to #f89e4e.
19)  Open a new layer. In the Layers Panel, place this layer below the layer you created in Step 11.
20)  Select the Brush Tool and make the following changes in the Tool Options Bar:
Make sure the Hardness has been set to 0%.
21)  Left-click on the center of the circle. You will not be able to see the effect of this step because it is happening beneath the Circle.
22)  Go to Filter > Blur > Radial Blur, make the following changes and click OK:
23)  Open Layer Style for the current layer and make the following changes:
The Color of Glow has been set to #fece66.
24)  Press CTRL+T to rotate the radial lines and place them as shown in the image below:
25)  Open a new layer. Make sure this layer is above the layer you created in Step 11.
26)  Select the Gradient Tool and make the following changes in the Tool Options Bar:
27)  Draw a small vertical line amongst the radial lines using the Gradient Tool.
28)  Press CTRL+T and transform the shape into one similar to an oval.
29)  Open Layer Style for the current layer and make the following changes:
30)  Duplicate the current layer.
31)  Open Layer Style for the current layer and make the following changes:
The Color of Glow has been set to #f87206. Your circle should look like this by now:
That’s it, babe. Final Result:
Voila.
Read More

Photoshop tutorial : Alien Text Effect


In this easy tutorial I’m going to show you how to make a really cool, high-tech, alien-like text effect (wow, long name!) Mostly just using layer styles, but also some filters to finish it off nicely. You can see my result image below, which you’re going to be making something very similar to!

1. Creating a Background

First thing’s first, create a new document in which you can make your text, use a size of about 400 x 200 pixels. Now make a background that will suit the theme. I started the background by first making a few white gradients on a black background.

(With the gradient tool, using a black and white gradient, change the gradient tool mode to Lighten)
White Gradients Black Background
Next, apply Filter > Distort > Wave with any old random setting.
Filter Distort Wave Applied
(settings do not matter here, you just want to get a random effect for the background)
Now, create a new layer and fill it with #47711f (green) or a similar color – change the layer mode for your new layer to Color and lower the opacity to around 80%.
Color Layer Mode
Merge the background layers together then duplicate the remaining layer, apply Filter > Disort > Wave with another random setting, change the layer mode to Overlay and lower the opacity to around 80%.
(this will make the background seem more vivid!)
Layer Mode Overlay Changed
Now, lastly for the background layer, I added in some blood splat brushes and changed the layer mode to Soft Light. You can download the blood-splat brushes that I used from here: Download Blood Splat Brushes.
This is what I gave after adding some brushes to my canvas:
Blood Splat Brushing
Looking pretty cool so far, huh? :)

2. Create Your Text

First thing, change your foreground color to a darkish-green color, then write out your text.
Written Text
The font that I’ve used in the above screenshot is called Bebas, the font size was 72 pt, and the color used is #3c5516.

3. Style your Text (Layer Styles)

Now it’s time to give your text a really cool effect using layer styles! Right-click the text layer and go into the Blending Options, choose the following settings:
  1. Drop Shadow
  2. Outer Glow
  3. Inner Glow
  4. Bevel and Emboss
  5. Gradient Overlay
  6. Pattern Overlay (this pattern comes with Photoshop)
And now your text should now look something like this:
After Applying Layer Stylles
Well at the moment it doesn’t look all that brilliant, but after the additional filter effects, I think it looks much better! Don’t worry if it’s not exact, it doesn’t really matter.

4. Additional Filter Effects

Firstly, create a new layer then Apply the Image (Image > Apply Image…) this will have made everything visible in the new layer. Now apply Filter > Distort > Wave with a random setting. Change the layer mode for this distorted layer to Lighten and lower the opacity to about 35-50%.
Lighten Layer Mode
Duplicate that distorted layer, then apply Filter > Blur > Gaussian Blur with any old amount, change the layer mode to Overlay and have the opacity at about 40-50%.
Alien-Like Text Effect Tutorial Result
Looks pretty cool, don’t you think? :)
You could finish this off by applying any of the cool filters, I especially like Filter > Noise > Add Noise.
Read More